
Easy Asian Breakfast Recipes: a Japanese-style morning plate
Rice balls, miso soup, and a few small sides — the kind of breakfast that actually keeps you full.

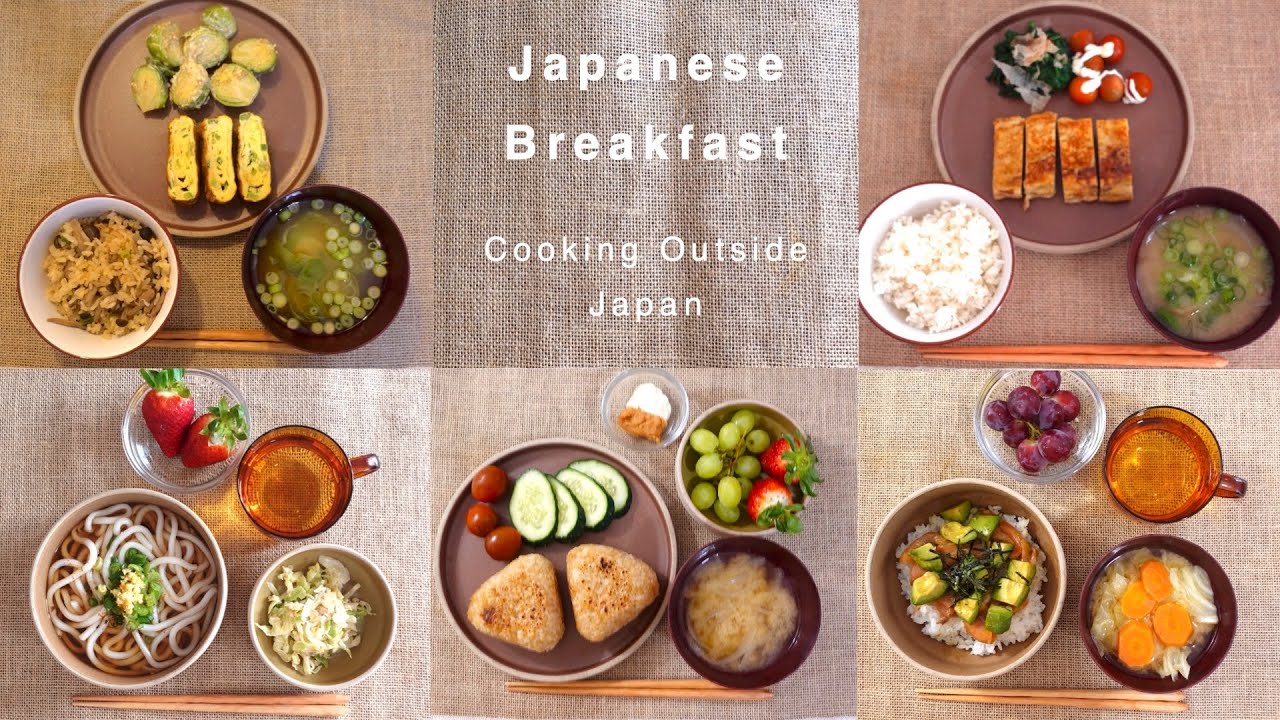
If you’ve ever scrolled through easy asian breakfast recipes looking for something that isn’t cereal or toast, this plate is a good place to land. It’s built around pan-fried onigiri — Japanese rice balls seasoned with soy sauce, sesame oil, and a little dashi powder, then crisped in a dry pan until the outside turns golden and slightly chewy. Alongside it, a five-minute miso soup and a couple of quick vegetable sides round things out into a real, satisfying breakfast.
Part of what makes this style of morning meal appealing is the contrast: warm, savory rice with a crisp shell, a light umami-rich soup, and something crunchy or cool on the side, like cucumber or a green salad. It’s not sweet, it’s not heavy, and it reheats well if you’re making it ahead for a weekday morning.
This format also happens to be flexible. Once you understand the base ratios — rice to seasoning, dashi to water — you can swap in leftover rice, different vegetables for the soup, or a quick tamagoyaki (rolled omelette) instead of onigiri, and you’ll land in familiar territory covered by other easy breakfast recipes on this site, just with a Japanese pantry instead of a Western one.
Below you’ll find the full recipe for the onigiri and soup, the reasoning behind each step, common mistakes to avoid, and answers to the questions people usually have the first time they try a Japanese-style breakfast at home.
Why This Recipe Works
Onigiri depends almost entirely on one thing: how sticky the rice is. Short-grain Japanese rice (or another short-grain “sticky” rice) has a high amylopectin content, which is what lets the grains cling together once you press them into shape. Long-grain rice, like basmati or jasmine, doesn’t have enough of this starch and tends to fall apart, which is why the rice type matters more than almost anything else in this recipe.
Seasoning the rice before shaping — rather than after — also matters. Mixing in soy sauce, sesame oil, mirin, and a little bonito (dashi) powder while the rice is still warm lets it absorb the seasoning evenly, and the small amount of oil in the mix means you don’t need to add oil to the pan later. That’s also why the onigiri browns instead of steaming: the sesame oil in the rice itself is what crisps the outside.
The stickiness of the rice does the shaping. The oil already in the rice does the browning. Everything else is just timing.
The miso soup follows a similarly simple logic — dashi (savory stock) provides the umami base, and miso is stirred in at the very end because boiling it hard can dull its flavor and destroy some of its beneficial live cultures.
Tips Before You Start
A few small things make this recipe far easier the first time you make it:
Have a small bowl of water nearby for wetting your hands before shaping — dry hands make the rice stick to your fingers instead of to itself. And don’t skip the resting step in the pan; moving the onigiri too early is the most common reason it falls apart or doesn’t brown evenly.
Quick Recipe Information
Ingredients
- 300g cooked short-grain Japanese rice (or another sticky rice — this is what lets the onigiri hold its shape; long-grain rice won’t work well here)
- 1/2 tsp bonito (dashi) powder — adds savory depth; swap for a vegetarian kombu dashi powder if needed
- 1/2 tsp toasted sesame oil — seasons the rice and helps it crisp in the pan without added oil
- 1/2 tsp mirin — adds a touch of sweetness and shine; a scant 1/4 tsp sugar mixed with a splash of water is a reasonable substitute
- 1 tbsp soy sauce — the main savory-salty note; use tamari for a gluten-free version
For the quick miso soup: 400ml water, 1/2 tsp bonito powder, 1–2 tbsp miso paste (to taste), and 1/4 onion, thinly sliced.
Equipment Needed
- Non-stick frying pan
- Small saucepan (for the soup)
- Plastic wrap or a rice paddle (for shaping)
- Mixing bowl
- Fine mesh strainer (for dissolving miso smoothly)
Step-by-Step Instructions
- Season the warm rice. In a bowl, combine the cooked rice with bonito powder, sesame oil, mirin, and soy sauce. Fold gently with a rice paddle rather than stirring hard, so you don’t crush the grains. The rice should look glossy and evenly coated.
- Shape the onigiri. Wet your hands lightly, divide the rice into two portions, and press firmly into triangles or rounds using plastic wrap to help hold the shape. Press firmly enough that the rice compacts — a loose ball will fall apart in the pan.
- Pan-fry until golden. Place the onigiri in a dry non-stick pan over medium heat (no oil needed — the sesame oil in the rice is enough). Cook for about 3–4 minutes per side, undisturbed, until a golden crust forms. [VERIFY exact timing may vary slightly by pan and heat level]
- Start the miso soup. While the onigiri cooks, bring 400ml water with bonito powder and sliced onion to a simmer in a saucepan. Cook until the onion softens, about 4–5 minutes.
- Dissolve the miso. Remove the pot from heat, add miso paste to a small strainer, and dissolve it into the soup by pressing it through with a spoon. Adding miso off the heat protects its flavor and live cultures.
- Plate and serve. Serve the onigiri hot alongside the soup, with a cucumber or salad side if you’d like. Eat right away while the onigiri is still crisp.
Baked Soy-Sesame Onigiri & Miso Soup
A simple, savory Japanese-style breakfast plate — crisp pan-fried rice balls with a quick five-minute miso soup.
Ingredients
- 300g cooked short-grain rice
- 1/2 tsp bonito (dashi) powder
- 1/2 tsp toasted sesame oil
- 1/2 tsp mirin
- 1 tbsp soy sauce
- 400ml water (for soup)
- 1–2 tbsp miso paste
- 1/4 onion, sliced
Instructions
- Mix warm rice with dashi powder, sesame oil, mirin, and soy sauce.
- Shape into two firm triangles or rounds using wet hands.
- Pan-fry, dry pan, medium heat, ~3–4 min per side until golden.
- Simmer water, dashi powder, and onion for the soup, 4–5 min.
- Remove from heat and dissolve miso in through a strainer.
- Serve onigiri hot with the soup on the side.
Chef’s Tips
- Compact the rice firmly. A loose onigiri will crack or fall apart in the pan — press with real pressure while shaping.
- Don’t flip too early. Give the crust time to form (about 3 minutes) before you try to move it, or it will stick and tear.
- Warm rice shapes better than cold. If using fridge-cold rice, microwave briefly with a splash of water first.
- Taste your miso before adding it all. Miso brands vary a lot in saltiness — start with 1 tbsp and add more to taste.
- Keep a small bowl of water nearby for wetting your hands between onigiri — it prevents sticking without adding extra moisture to the rice.
Common Mistakes
- Using long-grain rice. It happens because long-grain rice is what’s on hand, but it lacks the starch to hold together. Fix: use short-grain Japanese, Korean, or another sticky rice variety.
- Boiling the miso soup after adding miso. This flattens the flavor. Always remove the pot from heat first, then stir in the miso.
- Not pressing the rice firmly enough. Loosely shaped onigiri crumble apart in the pan. Press with real, sustained pressure when shaping.
- Overcrowding the pan. Cooking too many onigiri at once lowers the pan temperature and leads to steaming instead of crisping. Cook in batches if needed.
- Adding oil to the pan. The onigiri already contains sesame oil; extra oil in the pan can make the outside greasy rather than crisp.
Recipe Variations
- Vegetarian: swap bonito (dashi) powder for a kombu-based vegetarian dashi powder in both the rice and soup.
- Gluten-Free: use tamari instead of regular soy sauce, and confirm your miso paste is labeled gluten-free.
- Spicy: mix a little shichimi togarashi (Japanese seven-spice) or a small amount of chili oil into the rice before shaping.
- Dairy-Free: this recipe is naturally dairy-free as written.
- Low Carb: substitute cauliflower rice for a portion of the cooked rice, keeping in mind it will shape less firmly.
- Kid-Friendly: reduce the soy sauce slightly and skip the mirin’s sweetness boost if your kids prefer a milder flavor; shape into small, easy-to-hold rounds.
- Salmon & Avocado Bowl variation: for a change of pace, serve seasoned rice with diced avocado, smoked salmon, sesame oil, soy sauce, and a little wasabi instead of shaping onigiri — a nod to the poke-style bowl this same breakfast rotation often includes.
Storage & Reheating
Refrigeration: store cooked, unfried onigiri (shaped but not pan-fried) in an airtight container for up to 2 days. Pan-fried onigiri are best fresh, but leftovers keep for a day.
Freezing: shape and freeze unfried onigiri on a tray, then transfer to a freezer bag; they keep well for about a month. Thaw in the fridge overnight before pan-frying.
Reheating: reheat pan-fried onigiri in a dry pan over medium-low heat to re-crisp the outside; microwaving works but softens the crust.
Shelf life: miso soup keeps refrigerated for up to 2 days — reheat gently and avoid a hard boil to protect the miso’s flavor.
Meal prep tip: cook a larger batch of rice on a Sunday, season and shape onigiri ahead, and pan-fry fresh each morning for a faster weekday routine.
Serving Suggestions
- Cucumber with miso-mayo sauce — the cool crunch balances the warm, savory rice and soup.
- Simple green salad or sesame cabbage salad — adds fiber and freshness to round out the plate.
- Fresh fruit — grapes or citrus work well as a light, sweet contrast at the end of the meal.
- Green tea or barley tea — a traditional, non-sweet pairing that won’t compete with the umami flavors.
- Tamagoyaki (rolled omelette) — for a bigger breakfast, add a few slices alongside the onigiri.
Nutrition Information
Calculated per serving (2 onigiri + soup base), using standard USDA-type values for the ingredients listed above.
Sodium is high mainly because of the soy sauce and miso; using a low-sodium soy sauce or less miso will lower this noticeably. These values are estimates and will vary based on the specific brands of soy sauce, miso, and dashi powder used, and don’t include optional sides like cucumber, salad, or fruit.
Frequently Asked Questions
Can I use regular long-grain rice for onigiri?
It’s not recommended. Long-grain rice doesn’t have enough sticky starch to hold its shape, and the onigiri will likely fall apart while shaping or cooking. Short-grain Japanese or Korean rice works best.
Do I need a rice cooker to make this?
No — you can cook short-grain rice on the stovetop. A rice cooker just makes the texture more consistent.
What is bonito powder, and can I skip it?
Bonito (hondashi) powder is a dried fish-based seasoning used to make dashi, the savory stock base in Japanese cooking. You can skip it, but the rice and soup will taste noticeably flatter. A kombu-based vegetarian dashi powder is a good substitute.
Is this recipe vegetarian?
Not as written, since bonito powder is fish-based. Swap in a kombu (seaweed) dashi powder to make it vegetarian.
Can I make the onigiri ahead of time?
Yes. Shape them the night before and refrigerate, then pan-fry fresh in the morning for the best texture.
Why did my onigiri fall apart in the pan?
Usually it’s one of two things: the rice wasn’t sticky enough (wrong rice type) or it wasn’t pressed firmly enough while shaping.
Can I bake the onigiri instead of pan-frying?
Yes — bake at around 400°F (200°C) for 15–20 minutes, flipping halfway, though the crust will be less crisp than a stovetop sear. [VERIFY exact oven timing for your setup]
What can I put inside the onigiri?
This version is plain seasoned rice, but a small pocket of filling — like salted salmon flakes or pickled plum — is a common addition once you’re comfortable with the shaping.
Is miso soup healthy for breakfast?
Miso soup is light, low in calories, and contains fermented soybean paste, though it is fairly high in sodium — worth keeping in mind if you’re watching your sodium intake.
How is this different from a Korean egg bread or Korean omelette breakfast?
Korean egg bread and Korean-style omelettes lean sweeter and egg-forward, while this Japanese plate is rice- and soup-based with a more savory, umami profile — both fall under easy Asian breakfast recipes but use different base ingredients.
Can I make this gluten-free?
Yes — use tamari instead of soy sauce and check that your miso paste and dashi powder are labeled gluten-free, since some brands include wheat.
Final Thoughts on Easy Asian Breakfast Recipes
Once you’ve made this a couple of times, the ratios become second nature — a scoop of warm rice, a splash of soy sauce and sesame oil, a quick simmer for the soup. It’s the kind of breakfast that feels more substantial than toast without requiring much more effort, which is probably why it keeps showing up in searches for easy asian breakfast recipes in the first place.
If you like the format, it’s worth saving — the same base technique works for the tamagoyaki, poke bowl, and takikomi gohan variations mentioned above, so you’re really learning a small system of easy Japanese breakfast recipes rather than just one dish.
Watch the Original Video
Easy Asian Breakfast Recipes
Ingredients
- 300 g cooked short-grain Japanese rice (or another sticky rice — this is what lets the onigiri hold its shape; long-grain rice won't work well here)
- 1/2 tsp bonito (dashi) powder — adds savory depth; swap for a vegetarian kombu dashi powder if needed
- 1/2 tsp toasted sesame oil — seasons the rice and helps it crisp in the pan without added oil
- 1/2 tsp mirin — adds a touch of sweetness and shine; a scant 1/4 tsp sugar mixed with a splash of water is a reasonable substitute
- 1 tbsp soy sauce — the main savory-salty note; use tamari for a gluten-free version
Instructions
- 300g cooked short-grain Japanese rice (or another sticky rice — this is what lets the onigiri hold its shape; long-grain rice won't work well here)
- 1/2 tsp bonito (dashi) powder — adds savory depth; swap for a vegetarian kombu dashi powder if needed
- 1/2 tsp toasted sesame oil — seasons the rice and helps it crisp in the pan without added oil
- 1/2 tsp mirin — adds a touch of sweetness and shine; a scant 1/4 tsp sugar mixed with a splash of water is a reasonable substitute
- 1 tbsp soy sauce — the main savory-salty note; use tamari for a gluten-free version